Junction function
In the over-rafter system without sheathing, the ridge is the simplest detail of a pitched roof: termPIR® AL boards run continuously across the entire slope up to the ridge line, where boards from both slopes meet. No gaps, no thermal bridges, no additional insulation flashings.
This is a fundamental difference vs sandwich panel systems (insPIRe® D), where the ridge requires separate OB-22/OB-23 flashings and precise panel cutting. In the over-rafter system, it is enough to provide:
- Boards cut at the pitch angle — edges of both slopes meet along the ridge line.
- Aluminium tape at the joint — preserves the vapour tightness of the insulation layer.
- Windproofing through the ridge — vapour-permeable membrane laid with a min. 200 mm overlap.
- Broken counter-battens + vented ridge cap — ventilation of the space beneath the covering.
Critical installation aspects
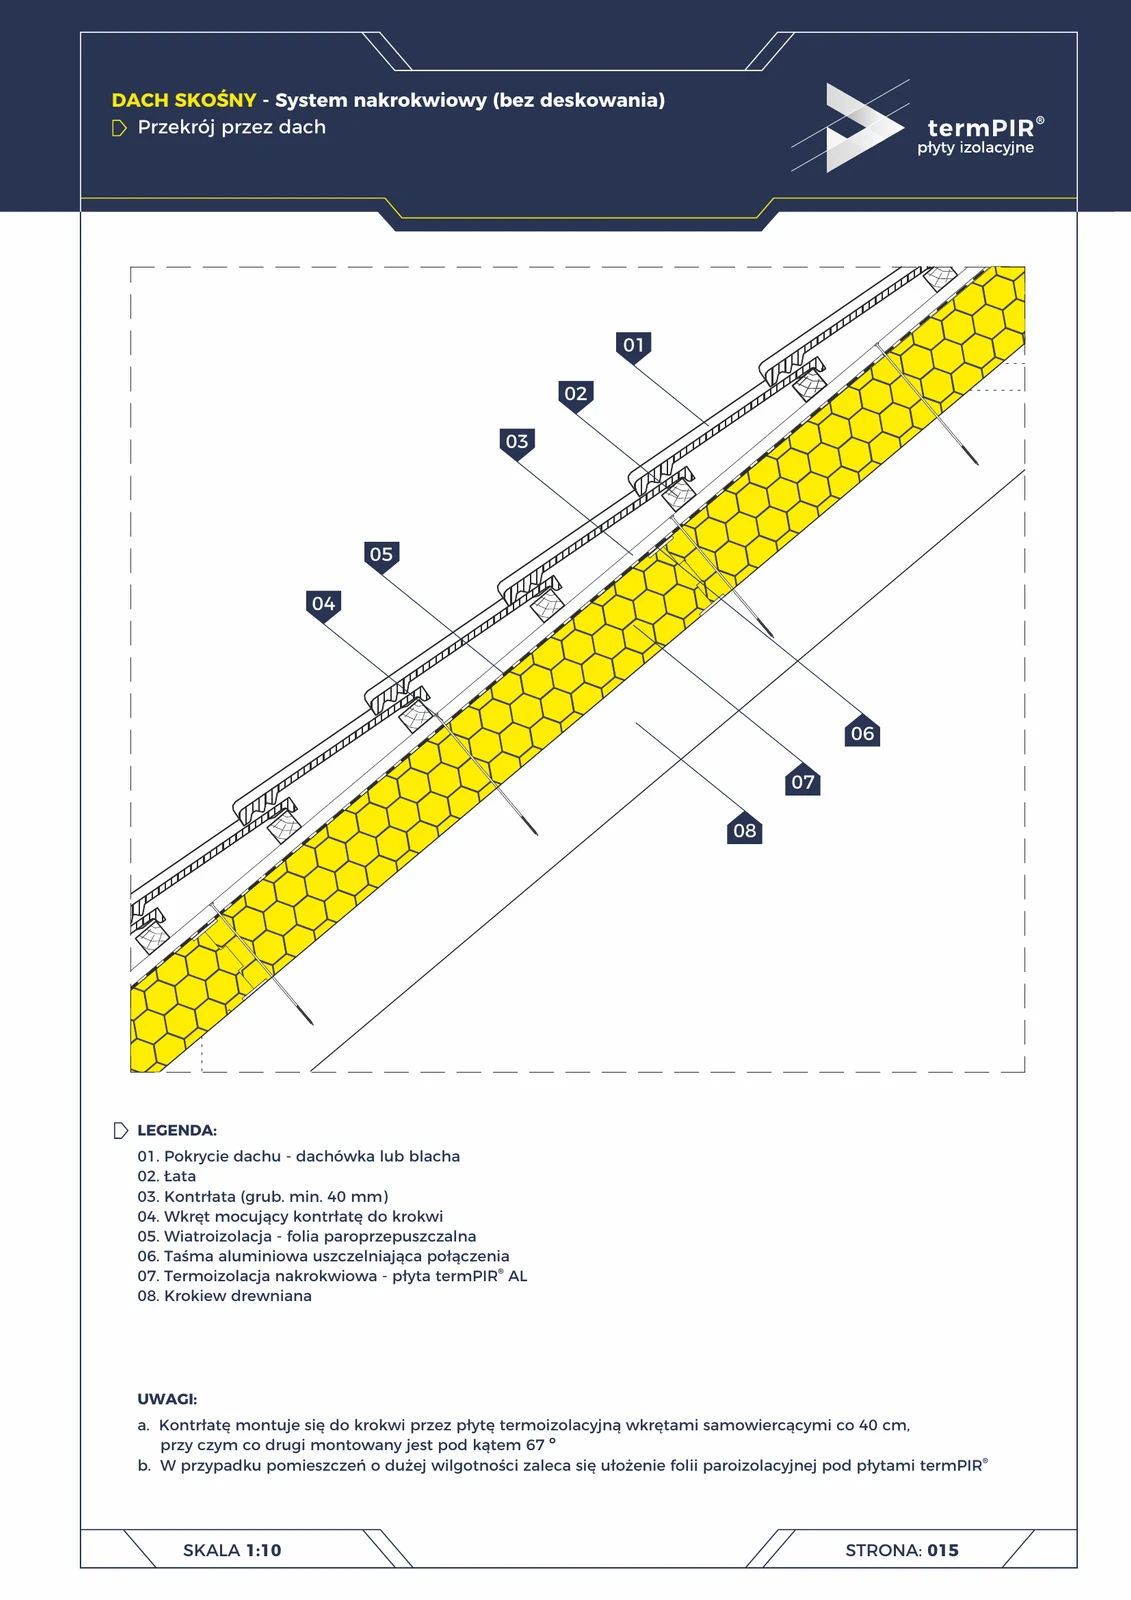
- Counter-batten fixing (item 03) — fastened to the rafter through the insulation board with self-drilling screws (item 04) every 40 cm, with every second screw at a 67° angle (transfer of shear forces from the covering to the rafter, prevents sliding).
- Cutting boards at the ridge — at an angle matching the roof pitch (e.g. 30° → cut at 60° relative to the board surface). Joint geometry depends on the pitch angle.
- Aluminium tape (item 06) — width min. 75 mm, applied symmetrically on both slopes with an overlap ≥ 30 mm; prevents migration of vapour and air through the joint.
- Windproofing (item 05) — the vapour-permeable membrane must be continuous through the ridge, with a minimum 200 mm overlap on each side, sealed with butyl tape.
- Ridge ventilation — counter-battens are broken ~5 cm on both sides of the ridge; the covering gap is closed with a vented ridge cap or a dedicated ventilation tape. No ventilation = condensation under the covering and dampening of the windproofing.
- High-humidity rooms beneath the roof (sauna, bathroom, kitchen without extractor hood) — per note b of the catalogue: additional PE vapour barrier on the interior side, beneath the termPIR® boards.
System comparison — where does the ridge require flashings?
| Feature | Over-rafter termPIR® AL | Sandwich panel insPIRe® D |
|---|---|---|
| Dedicated ridge flashing | none (insulation continuity) | OB-22/OB-23 (separate) |
| Thermal bridge at ridge | none | minimal (between panels) |
| Number of metalwork elements | only vented ridge cap | ridge cap + ridge flashing |
| Installation tolerance | wide (board cut in-situ) | narrow (factory-made panel) |
| Detail installation time | ~30 min per linear metre | ~15 min (panel + ridge cap) |
| Roofer skills required | system knowledge + windproofing | typical sheet-metal roofer |
Occurs in the system pitched roof — termPIR® over-rafter.
Documentation
Technical Catalogue termPIR® — Residential Buildings (Gór-Stal 2022), page 15 — Pitched roof, over-rafter system (without sheathing), roof cross-section. Scale 1:10. Technical notes per notes a-b of the original.
Components in this junction
- 07 Over-rafter thermal insulation — termPIR® AL board
- 04 Screw fixing counter-batten to rafter (self-drilling, every 40 cm)
- 06 Aluminium sealing tape for joints (tasma-aluminiowa)
- 01 Roof covering — roof tile or sheet metal
- 02 Batten
- 03 Counter-batten (min. 40 mm thick)
- 05 Windproofing — vapour-permeable membrane
- 08 Timber rafter