Junction function
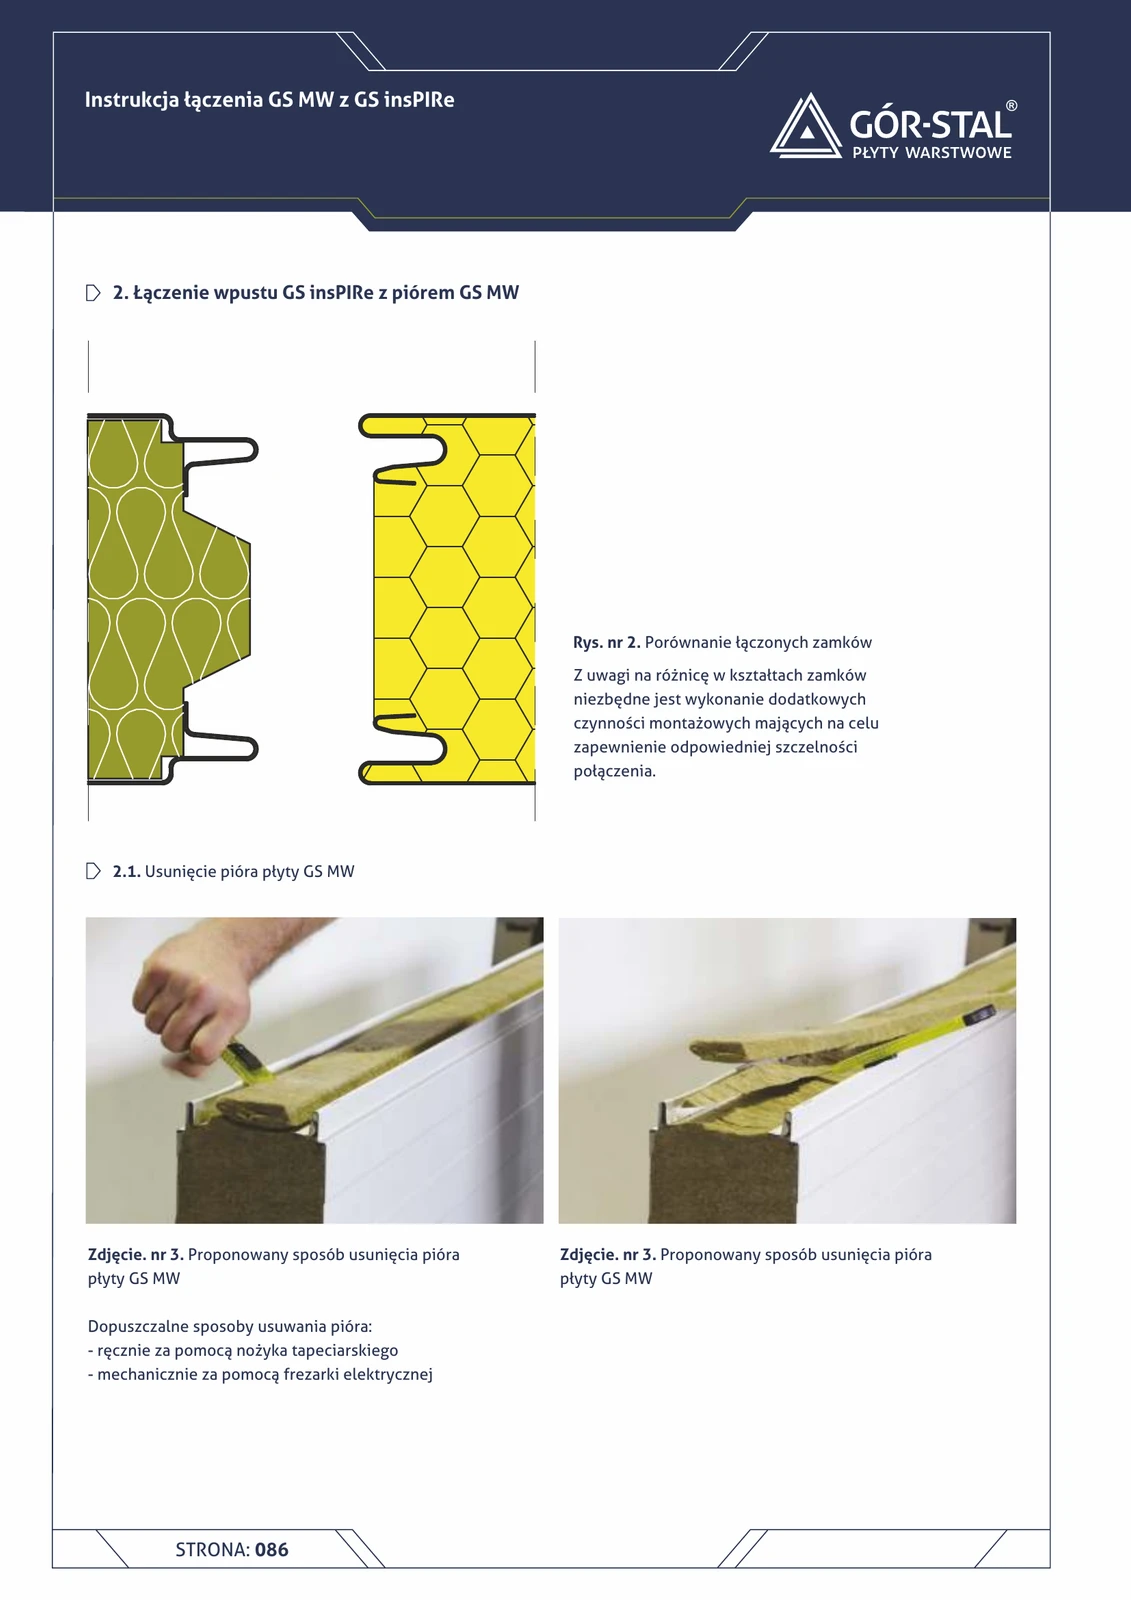
Joint between a GS insPIRe panel and an adjacent GS MW panel — installation detail at the boundary between zones of two sandwich panel systems within a single wall. The more difficult of the two possible MW × insPIRe joint configurations — it requires on-site modification of the MW tongue edge.
How the tongue-and-groove lock works
Every sandwich panel has a tongue on one edge and a groove on the other — this is the standard tongue-and-groove lock that connects adjacent panels on the façade. These are not two types of panels: every GS MW and every GS insPIRe panel has both edges (tongue + groove). At the joint between two adjacent panels, the tongue of one always meets the groove of the other.
Which variant this is
At the boundary between the MW and insPIRe zones, the joint may occur in two configurations (depending on panel installation orientation):
- Easier variant — grooved edge on the GS MW side meets tongued edge on the GS insPIRe side (wool strip in the MW groove): GS MW × GS insPIRe joint — MW groove + insPIRe tongue.
- This detail — the grooved edge on the GS insPIRe side meets the tongued edge on the GS MW side. Requires cutting out the MW tongue with a router, because the MW tongue is larger than the insPIRe groove.
Technical problem: the insPIRe groove has a profile matched to PIR (thinner, rigid), while the MW tongue has a profile matched to mineral wool (wider, soft). The MW tongue will not fit into the insPIRe groove without modification.
Practical procedure
- Measure the GS insPIRe groove — typically 30-40 mm deep, 80-100 mm wide.
- Remove the GS MW tongue — utility knife (thin tongue up to 50 mm) or router (thicker).
- Sand the edge with 80-120 grit sandpaper for smoothness.
- Insert the modified MW edge into the insPIRe groove.
- Glass wool strip fills the gap after sanding (compensating for the lost tongue geometry).
Critical installation aspects
- On-site operation — requires a prepared workstation with router + sandpapers; not feasible at typical installation pace.
- Only for experienced installation crews — incorrect sanding will destroy the mineral wool and weaken the panel’s load capacity.
- Standard fixing — self-drilling fasteners through the panels into the supporting structure; no special requirements.
- Double-sided butyl tape secures the glass wool strip in the space left by the cut-out MW tongue.
- OB-17 cover flashing recommended — the joint after sanding is irregular and aesthetically inferior to the easier variant.
- Reduced air-tightness — greater than in the easier variant (edge modified on site ≠ factory geometry); class 2 maximum.
- NOT recommended for air-conditioned halls / cold stores — factory geometry is required.
Used in rare unplanned retrofits — e.g. replacement of a damaged insPIRe segment with MW, when the existing frame has an insPIRe groove and only MW panels are available.
Documentation
GS MW S/CH/U Technical Catalogue (Gór-Stal 2025), page 86 — Joining the GS insPIRe groove with the GS MW tongue. Scale 1:5.
Components in this junction
- 01
- 02
- 03 Glass mineral wool strip (filling after cutting out the MW tongue)
- 06
- 05 Self-drilling fastener (panel-to-supporting structure fixing)
- 04 Double-sided butyl tape (securing the wool strip)
- 07 Neutral silicone sealant (face joint)